One ingenious foreigner invented at one time to hide toys in chocolate eggs. They say he received a lot of money for his invention. It would be interesting to listen to the opinion of the owners of the company if they had a look at those miraculous constructions that mothers are now constructing from Kinder to their children. Ships and hearts, hedgehogs and planes, faces, suns and many other crafts. Do not know how to mess with the test, and so you want to prepare a gift with your own hands? Let's try it together!
General principles for making gift cakes from kinder
• There are many options for decorating a cake from kinder. Some products seem complicated, but this is only at first glance. In fact, it’s easy to make a cake from Kinder with your own hands, the main thing is to choose the right material and build the very foundation of such a product. For the formation of cakes, special blanks are used, which are made of cardboard or foam, fastening the material with hot glue, adhesive tape or PVA.
• Use corrugated paper to decorate the base. It easily stretches, which allows you to easily arrange any shape of the workpiece. In addition, this paper has another quality, if its edge is slightly stretched in different directions, a pretty frill is formed.
• Chocolates are fixed on the basis of double-sided tape, and the outer protective layer of adhesive tape is removed immediately before fixing the sweets on the frame. For decoration, they take thin chocolates (sticks), cakes in a package, sweets in wrappers and eggs with the Kinder logo. Often the composition is supplemented, for example, with a jar of Nutella chocolate paste or other sweets to taste.
• Decorate cakes from Kinder with satin ribbons, beads, lace and all kinds of accessories that can be purchased at the nearest needlework store. The top of the cakes intended for girls is decorated with artificial flowers or soft toys.
DIY Christmas cake from Kinder as a gift for a child
What you need to work:
• 16 small chocolates (sticks);
• one egg;
• chocolate figure of Santa Claus or Snow Maiden;
• Styrofoam;
• white corrugated paper;
• wide double-sided tape;
• red satin ribbon 0.5 cm wide;
• PVA emulsion (thick glue);
• sparkles (white).
• two small Christmas balls;
• thin brush for painting;
• medium-sized red beads;
• spruce cone;
• glue gun;
• organza ribbon;
• red "rain" (tinsel);
• small decorative snowflakes.
Working process:
1. First of all, it is necessary to make the basis of the cake. To do this, cut a 9 cm diameter circle from the foam. It is desirable that the height of the workpiece corresponds to the length of the chocolate bar, which will be glued to the base, but can also be made 1 cm lower. It is better to take a 3 cm thick foam and cut two identical circles from it, which glue together using a glue gun.
2. On corrugated paper, with a compass, draw two circles. One, with a blank with a diameter of 9 cm, and the second a little more: 10.5 cm and carefully cut them with scissors.
3. Using a glue gun, attach the larger circle to the bottom of the foam blank, and the smaller one to the top.
4. Then, from the same corrugated paper, cut a strip 28 cm long, and at least 8 cm wide and with hot glue, fasten it around the foam base. Extend the edge protruding from above, slightly stretch your fingers to get a beautiful frill.
5. Now you need to attach adhesive tape in a circle to the finished blank. To keep chocolates well, it is better to take a wide tape of adhesive tape and fix it in the center of the base. Thin tape is better to fix the bottom and top of the foam cylinder.
6. Gradually removing the upper protective strip of adhesive tape, attach the chocolates. Glue the "sticks" directly to each other, without leaving gaps between them and be sure to make sure that the inscriptions on the wrappers look only one way.
7. In the middle of one of the chocolates, apply a small drop of hot glue and immediately press the edges of the white organza to it. Pulling lightly, wrap all the chocolates with it and firmly fix the edge with a gun, in the same place as the beginning. On top of white, fasten the red, satin ribbon in the same way.
8. String the Christmas balls on a satin ribbon and fix by tying a tight knot. Then make a beautiful bow, cut off the excess edges and secure it with a gun at the junction of the ribbons. On top of the red bow, you can glue white organza.
9. On ribbons with a slight indent from each other, glue the snowflakes, and in their center beads.
10. Spangle mix with PVA emulsion or glue based on it and with a thin brush, gently apply cones on the petals, let dry. The remaining mixture can be used to color the balls.
11. Along the edge of the upper circle of the cylinder, before the paper frill, attach tinsel. In the center, fix the egg and Santa Claus with hot glue, and in front of them is a cone decorated with sequins.
How to assemble a do-it-yourself kinder cake for lovers in the shape of a heart
What you need to work:
• 3 cm penoplex;
• corrugated paper, color pale pink and burgundy;
• thick red satin ribbon 3 cm wide;
• thin white lace (1.5 cm wide);
• thick, 3 mm, cardboard;
• small white beads;
• glue gun;
• medium-sized artificial roses, small white flowers;
• wide double-sided tape;
• thin "Kinder" -chocolates;
• packaging of Raffaello cakes.
Working process:
1. From any sheet of paper, cut out a heart the size you want to make a cake. Put the prepared stencil on the foam sheet and circle it, then carefully cut along the contour.
2. Along the entire perimeter, step back one and a half centimeters from the edge, outline the outline and cut the middle along it, it is not needed. In the same way, prepare the second workpiece and glue them together.
3. Cut a long strip of burgundy paper, at least 16 cm wide, and glue it on the inside of the resulting workpiece. Then, gently pulling up the paper, wrap the whole heart in it.
4. According to the previously prepared stencil from thick cardboard, make the bottom and paste both sides with paper of the same color as the heart (for example, burgundy). Attach the bottom with a glue gun to the workpiece.
5. Cut a strip, 5 cm wide, from soft pink crepe paper and stick it on the outside of the heart so that it protrudes one and a half centimeters from above. Slightly stretch the paper with your fingers, draw the edge.
6. Using a strip of double-sided tape, fix the chocolates in a circle. Their number is determined individually and depends on the size of the cake.
7. For reliability and decor, cover the chocolates with a red ribbon, fixing it in some places with a glue gun. Attach lace to it in the same way.
8. Prepare a cover from thick cardboard, literally 1.5-2 mm smaller than the bottom. Paste its sides with soft pink paper, and the end with a red satin ribbon. When you start the ribbon on the upper side of the lid, place a delicate white lace under it.
9. From the buds of roses and small flowers, collect a small neat bouquet and glue it in the center of the lid. Small beads asymmetrically secure with a glue gun around the bouquet.
10. Open the Raffaello box, pour the cakes into the cake box and cover. In such a cake among sweets, you can hide a little surprise.
How to make a cake from kinder diets for girls’s birthday
What you need to work:
• corrugated paper scarlet or pink;
• regular and double-sided tape;
• thick 3 mm cardboard;
• gun, glue stick;
• satin ribbon for decoration;
• a compact jar of Nutella paste;
• "Kinder" egg;
• a small soft toy;
• "Kinder" -chocolates (sticks).
Working process:
1. For the basics of such a cardboard cake, prepare two circles with a diameter of exactly 18 cm and a strip of the same cardboard 60 cm long and 6.5 cm wide. Fasten its edges with one-sided tape and in the same way fasten the prepared circles on the rim above and below.
2. To decorate the backbone of the cake, cut out two identical circles from corrugated paper, with a diameter of cardboard as well as a strip, with a width of at least 8 cm. Its length should be equal to the circumference of the base.
3. Using a gun, securely attach paper circles to the top and bottom of the base. Then stick the strip so that it protrudes above the top and shape it in waves. To do this, slightly stretch the free edge of the paper with your fingers.
4. Use double-sided tape to glue the chocolate base to the sides, and fix the egg and jar of pasta with the same tape on top of the cake. Fix the soft toy next to the egg and paste with hot melt adhesive. You can sew it in advance to the base with threads.
5. Cover the cake with a satin ribbon. This will serve not only as a decor, the ribbon will not allow chocolates to peel off.
DIY cake kinder cake for a boy in the form of a boat
What you need to work:
• thin satin ribbons of white and red;
• small stars (red, white);
• red and white crepe paper;
• foam sheet 3 cm thick;
• a small plastic ring;
• hot glue and glue gun.
Working process:
1. From a smooth cardboard or thick paper, make a template along the contour of the sole of the iron and transfer it to a foam sheet, circle. Then, carefully cutting with a knife, prepare two identical blanks and glue them with hot-melt adhesive.
2. Prepare the cutting template. Draw a rectangle, round its narrow sides and cut it out. Transfer the drawing using the resulting template onto the foam. Cut along the contour, then cut in the middle along and glue, laying the halves on top of each other and thereby doubling the height.
3. In the same way, make a round pipe. It should not be high; a foam sheet will be enough.
4. From the red crepe paper, using the template, cut out two parts, like a deck, and attach them with glue to the bottom and top of the foam blank. Cover the sides of the boat with strips of paper of different colors, also fixing them with glue. In this case, put red on top of white so that it protrudes half a centimeter.
5. Decorate the cabin and pipe of the ship with white corrugation. Fix them on the base, retreating a centimeter from the stern (rear) of the boat.
6. On the sides of the case, stick a strip of wide 2-sided tape and press the chocolates against it, gradually removing the upper protective film from the adhesive tape.
7. Sew or attach white stars to the red ribbon with hot glue, and red to the white ribbon. Do not part, leave between them one and a half centimeters.
8. Use a red ribbon to shape the top of the cabin, and gently tie the fixed chocolates with a white ribbon.
9. With colored ribbons, wrap the plastic ring so that the colors alternate and fix it by laying on the stern, simulating a life buoy.
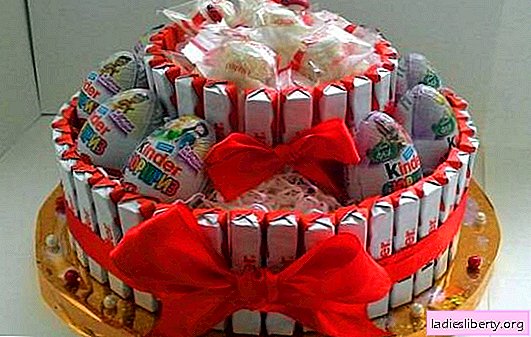
Do-it-yourself kinder bunker cake
What you need to work:
• two round cardboard or foam bases, of different heights and diameters;
• crepe paper in two colors;
• several sticks of glue and a thermogun;
• satin ribbon, in tone of paper;
• white organza ribbon;
• cake Kinder dellis;
• "Kinder" -chocolates (sticks);
• chocolate eggs with a surprise;
• double-sided tape;
• "Kinder" -wraps in wrappers.
Working process:
1. To build a two-tier cake, you must first prepare two bases of a round shape, of different diameters and heights. Such blanks can be made of polystyrene foam or glued from thick (3 mm) cardboard. The height of one should be calculated by the length of the cake, and the second by chocolate. Choose the diameter yourself, the main thing is that the packages with sweets fixed on the sides fit tightly together.
2. Decorate the cake tiers made of cardboard or polystyrene and decorate the crepe with paper. Stick on lighter tones on the basics, and dark on the sides. Decorating the sides, calculate the width of the paper strip so that its upper edge is a centimeter above the base. To form a wavy edge, stretch the paper slightly with your fingers.
3. Set the decorated lower tier in the center of the larger one and fix it with hot glue.
4. After that, when the base of the two-tier cake is ready, use scotch tape to attach the cakes on the sides of the lower tier, and the chocolates on the top. Make sure that all inscriptions "look" in one direction.
5. Fixing the edges of the organza with hot glue, tie a row of cakes first, and then a row of chocolate. Attach a satin ribbon to it with glue and fix its edges in the place where the organza was attached.
6. From pieces of ribbon or organza, tie beautiful bows and stick them on the tape, which tied the tiers. Start from where the ribbons were fastened to hide the seam.
7. Fill the empty space on the lower tier with sweets in wrappers, and put the “Kinder” eggs on the upper tier. Be sure to glue them with glue or double-sided tape.
How to make a kinder cake with your own hands in the form of a machine
What is necessary:
• corrugated packaging cardboard;
• Double-sided tape;
• red braid;
• ordinary construction tape;
• thin chocolates "Kinder";
• hot glue stick and gun;
• four chocolate medals;
• thick white paper;
• PVA glue;
• two decorative "eyes" (accessories).
Working process:
1. On the corrugated cardboard, draw a side projection of the car. But, before you draw, lay the chocolates, this will help not to make a mistake with the size of the workpiece.
2. When the part is ready, according to its template, prepare the second and draw the windows on both.
3. After that, cut a long strip from the same cardboard, exactly 5.5 cm wide, and secure it with construction tape between the side parts.
4. Place the blank on cardboard, circle it with a pencil and cut along the contour - this will be the bottom of the car. Attach it to the typewriter.
5. Paste the resulting cake blank with thick white paper.
6. On each bottom chocolate bar, attach a long strip of double-sided tape, then glue them on the frame made. Disconnect the top layer of tape just before fixing the chocolate bar. Do not seal the "windows" with chocolate.
7. Red braid, fixing it with hot glue, decorate the windows and the machine itself along the contour. Attach the accessories in the form of eyes to the front glass, and secure the chocolate medals (wheels) with double-sided tape.
8. You can install such a cake on a stand made of cardboard and covered with foil. The machine is attached, like chocolate, to tape.
DIY kinder cake - crafting tricks and tips
• Do not use hot glue to fasten chocolates. A delicate wrapper will be removed when the chocolate is separated from the base of the cake.
• To prevent chocolate from melting in a warm room, it is recommended to keep it in the refrigerator until it locks.
• Making a cake from Kinder with your own hands, you can decorate the product to your taste, complementing the decor with candles, numbers, bows or other sweets. Two-tier cakes look original if you sprinkle multicolored peanuts in the icing on the free space between the tiers or put Raffaello sweets.